

The Story Behind the Photograph
June 2011
How I photographed this Pileated Woodpecker
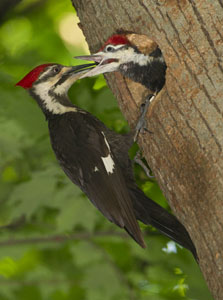
I heard the cries for days, but I thought the bird calls were the complaint notes of some songbird that had spotted a snake or cat. Four days later, in the same location, just forty yards from my studio/classroom building in our woods at Hoot Hollow, I heard the raspy jagged calls again, and investigating closer I spotted a pileated woodpecker flying off. Suddenly I recognized a call I'd heard many times, the begging call of baby woodpeckers!
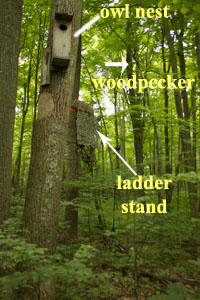
The babies were large and looked as if they might fledge at any moment. My friend Sam was visiting at the time and together we started putting up a Warren and Sweat Ladder Stand, a deer-hunting accessory that features a 14 foot ladder that leads to a seat and foot rest where a hunter would sit waiting for game. The stand was the fastest of several options we had,which included a climbing treestand and a tower stand, again both deer hunting accessories, or a difficult to erect tower that would reach 30 feet in height and require several hours to set up.
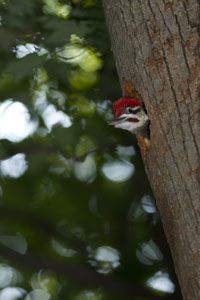
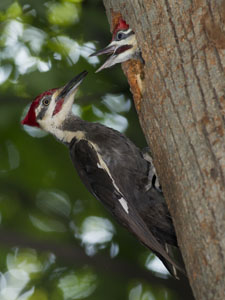
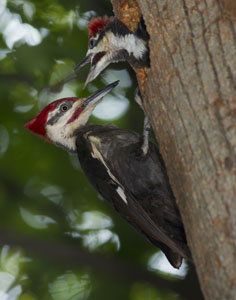
A comparison of color temperature, with the immature woodpecker on the left shot with natural light, and showing the greenish/yellow cast to the image. On the right, the flash shot, without the color shift from light filtering through the trees.
Pileateds often nest in the woods where the color temperature, or color tint, creates a terrible sickly green cast. While this light might be fixed in the Raw Converter with White Balance, the light level was low under the forest canopy and the shutter speeds would have been slow. Flash was the only solution, and the easiest and fastest flash fix was simply to rig a Visual Echoes tele-flash (BetterBeamer) at the nest hole. This lighting, however, would have been straightforward and flat, so I decided to rig three Canon flashes and fire these with the wireless Slave/Master setting.
 This wasn't easy, and that's an understatement, since I had two flashes screwed onto a homemade brace that was mounted on a 13 foot Manfrotto Light Stand. To direct the flashes and aim them correctly I did all sorts of contortions -- stretched out, with one leg locked into a step while I struggled with a ballhead one-handed. The other flash I mounted on a Manfrotto Articulated Arm on the ladder stand, aimed high to hit the nest from a different angle with the wireless master light pointed at the other flashes. This system worked, at first, but as I double-checked the operation it stopped firing, and after nearly an hour of trying options -- as the afternoon hours ticked by -- I gave up on the Canon wireless option.
I switched to the very reliable hard-wired Sunpak flashes that I use for our Bat and Hummingbird Photography in Arizona which required more time as one system was removed and the wiring strung for the Sunpaks. I mounted my 500mm on a Wimberley Gimbalhead on a Gitzo tripod which I lashed into place on the gun rest arm of the ladder stand.
The birds were not going to fly in to the nest with Sam or I sitting in the open, so I rigged up a hunting umbrella that mounts to a tree. These umbrellas are basically a 3/4 canopy, split so that a tree trunk can parallel the umbrella's shaft. The canopy of the umbrella is secured around the tree with ties, but I found that the tree trunk was too large for me to safely reach around the tree to tie the strings. We grabbed my 24 foot extension ladder and placed that on the other side of the stand, tied that in, and from that position I tied the umbrella in place.
The walls of the blind were made from camouflage netting that I secured to the edges of the umbrella by tiny clamps that I snapped along the edge. The netting hung down over the blind, although the netting only went only as far as our calves. That is not a problem unless you move your legs when a bird is about.
This setup, begun about 1PM was finished by 5, and I got into the blind to try our first round of shooting. An adult flew in (by the way, we left the area several times during the setup so that the adults could return to feed -- and they did) within minutes, and I started firing away, stupidly ignoring the fact that the flashes needed to recycle! My first shot was fine, but the rest were underexposed. In theory, though, we knew the system would work.
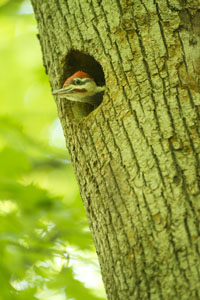
The following day Sam and I took turns shooting from the stand, and as luck would have it Sam got some great shots when all three babies stuck their heads out as an adult fed them. Later, on that same rotation, one of the young birds fledged, firing out of the nest on its first flight.
I planned to shoot again the morning of the next day, but it was gloomy and thunderstorms were forecasted, and since I suspected the babies would fledge, and rain was imminent, I took down all of the equipment. Later that day I visited Cabela's, and purchased a new Climbing Tree Stand that looked sturdy and would get me higher up a tree. I didn't think I'd use the tree stand this year, but figured I'd be ready with the proper equipment if the bird nested in or near the same spot next year.
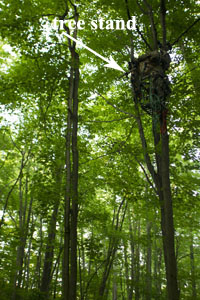 The next morning I was surprised to find the two remaining chicks still in the nest, so I put the tree stand together and mounted it on a closer tree. With ropes attached to my light stands and camera bags, housing my cameras, lenses, flashes, and batteries, I clambered up the tree for 30 feet where I repeated the process of building a blind. This time I used Manfrotto Articulated Arms only for mounting the flashes, since I was too high -- 30 feet -- for any light stand.
This, too, was pretty nerve-wracking, as there wasn't much room for error with my balance or dropping a piece of gear but by 2PM I was in
the blind and waiting. While I sat waiting a mother Wild Turkey with 3 tiny chicks walked by, and later another turkey foraged closeby in the undergrowth. Twenty yards closer to my studio, by the way, an Eastern Screech Owl was also nesting, and next to our house a Crested Flycatcher was using another nest box. So, bird life is good here at Hoot Hollow!
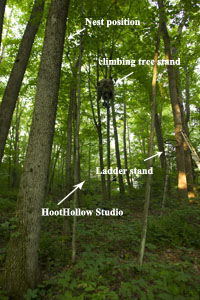 The adults flew in soon after I settled into the new blind, and from my new position I was able to use a 400mm lens and a smaller tripod, which was much easier to manipulate high in the tree. At the ladder stand, we had to do an extremely painful contortion with the tripod and lens set far off to the right to avoid a big oak leaf that would have otherwise covered the nest hole. Now, from the treestand, I had a clear view.
Sounds pretty straightforward, right? Well, here's what was involved in this shoot:
1 Warren and Sweat Ladder Stand
1 Cabela's Climbing Tree Stand.
1 24 foot extension ladder.
6 canvas tension straps.
2 rubber utility cables - to anchor the ladder stand.
2 Manfrotto variable friction Magic Arms.
3 Manfrotto Articulated Arms.
1 13 foot Manfrotto Light Pole.
1 Wimberley Gimbal head.
1 Gitzo Tripod.
4 sheets of Camouflage netting for the blind.
1 Hunting umbrella roof.
4 Sunpak flashes.
1 6 volt battery.
4 Stroboframe mini-hotshoe brackets.
1 custom built 2 flash bracket.
1 custom built flash console for power.
30 mini hand clamps.
4 large hand clamps.
10 plastic bags - for overnight weather-proofing.
1 10 foot flash cable.
1 Nikon AS15 hotshoe mount - for triggering the flash.
1 Canon 1D Mark IV camera.
1 500mm lens - used from the ladder stand.
1 400mm lens - used from the treestand.
A lot of gear and a lot of work, but the results were worth it for me, to photograph a nesting pileated woodpecker in my own woods, just yards from my studio. And, this also illustrates the wonderful shooting opportunities all of us often have at home, and how any opportunity should be exploited, even though I thought the birds might fledge even as I was setting up! They didn't, and I got three extra days of shooting after the first baby fledged!
.jpg)
As I write this our Crested Flycatcher is so tame that one of the pair sits on the photo perch I erected before the nesting season started completely at ease as I walk by, within 15 feet of the nest and perch. Although I've photographed this pair every summer, I'm sure I'll be tempted to do so again -- the babies have hatched and the adults are beginning to feed!
The Story Behind the Photograph
June 2011
How I photographed this Pileated Woodpecker
I heard the cries for days, but I thought the bird calls were the complaint notes of some songbird that had spotted a snake or cat. Four days later, in the same location, just forty yards from my studio/classroom building in our woods at Hoot Hollow, I heard the raspy jagged calls again, and investigating closer I spotted a pileated woodpecker flying off. Suddenly I recognized a call I'd heard many times, the begging call of baby woodpeckers!
The babies were large and looked as if they might fledge at any moment. My friend Sam was visiting at the time and together we started putting up a Warren and Sweat Ladder Stand, a deer-hunting accessory that features a 14 foot ladder that leads to a seat and foot rest where a hunter would sit waiting for game. The stand was the fastest of several options we had,which included a climbing treestand and a tower stand, again both deer hunting accessories, or a difficult to erect tower that would reach 30 feet in height and require several hours to set up.
A comparison of color temperature, with the immature woodpecker on the left shot with natural light, and showing the greenish/yellow cast to the image. On the right, the flash shot, without the color shift from light filtering through the trees.
Pileateds often nest in the woods where the color temperature, or color tint, creates a terrible sickly green cast. While this light might be fixed in the Raw Converter with White Balance, the light level was low under the forest canopy and the shutter speeds would have been slow. Flash was the only solution, and the easiest and fastest flash fix was simply to rig a Visual Echoes tele-flash (BetterBeamer) at the nest hole. This lighting, however, would have been straightforward and flat, so I decided to rig three Canon flashes and fire these with the wireless Slave/Master setting.
This wasn't easy, and that's an understatement, since I had two flashes screwed onto a homemade brace that was mounted on a 13 foot Manfrotto Light Stand. To direct the flashes and aim them correctly I did all sorts of contortions -- stretched out, with one leg locked into a step while I struggled with a ballhead one-handed. The other flash I mounted on a Manfrotto Articulated Arm on the ladder stand, aimed high to hit the nest from a different angle with the wireless master light pointed at the other flashes. This system worked, at first, but as I double-checked the operation it stopped firing, and after nearly an hour of trying options -- as the afternoon hours ticked by -- I gave up on the Canon wireless option.
I switched to the very reliable hard-wired Sunpak flashes that I use for our Bat and Hummingbird Photography in Arizona which required more time as one system was removed and the wiring strung for the Sunpaks. I mounted my 500mm on a Wimberley Gimbalhead on a Gitzo tripod which I lashed into place on the gun rest arm of the ladder stand.
The birds were not going to fly in to the nest with Sam or I sitting in the open, so I rigged up a hunting umbrella that mounts to a tree. These umbrellas are basically a 3/4 canopy, split so that a tree trunk can parallel the umbrella's shaft. The canopy of the umbrella is secured around the tree with ties, but I found that the tree trunk was too large for me to safely reach around the tree to tie the strings. We grabbed my 24 foot extension ladder and placed that on the other side of the stand, tied that in, and from that position I tied the umbrella in place.
The walls of the blind were made from camouflage netting that I secured to the edges of the umbrella by tiny clamps that I snapped along the edge. The netting hung down over the blind, although the netting only went only as far as our calves. That is not a problem unless you move your legs when a bird is about.
This setup, begun about 1PM was finished by 5, and I got into the blind to try our first round of shooting. An adult flew in (by the way, we left the area several times during the setup so that the adults could return to feed -- and they did) within minutes, and I started firing away, stupidly ignoring the fact that the flashes needed to recycle! My first shot was fine, but the rest were underexposed. In theory, though, we knew the system would work.
The following day Sam and I took turns shooting from the stand, and as luck would have it Sam got some great shots when all three babies stuck their heads out as an adult fed them. Later, on that same rotation, one of the young birds fledged, firing out of the nest on its first flight.
I planned to shoot again the morning of the next day, but it was gloomy and thunderstorms were forecasted, and since I suspected the babies would fledge, and rain was imminent, I took down all of the equipment. Later that day I visited Cabela's, and purchased a new Climbing Tree Stand that looked sturdy and would get me higher up a tree. I didn't think I'd use the tree stand this year, but figured I'd be ready with the proper equipment if the bird nested in or near the same spot next year.
The next morning I was surprised to find the two remaining chicks still in the nest, so I put the tree stand together and mounted it on a closer tree. With ropes attached to my light stands and camera bags, housing my cameras, lenses, flashes, and batteries, I clambered up the tree for 30 feet where I repeated the process of building a blind. This time I used Manfrotto Articulated Arms only for mounting the flashes, since I was too high -- 30 feet -- for any light stand.
This, too, was pretty nerve-wracking, as there wasn't much room for error with my balance or dropping a piece of gear but by 2PM I was in
the blind and waiting. While I sat waiting a mother Wild Turkey with 3 tiny chicks walked by, and later another turkey foraged closeby in the undergrowth. Twenty yards closer to my studio, by the way, an Eastern Screech Owl was also nesting, and next to our house a Crested Flycatcher was using another nest box. So, bird life is good here at Hoot Hollow!
The adults flew in soon after I settled into the new blind, and from my new position I was able to use a 400mm lens and a smaller tripod, which was much easier to manipulate high in the tree. At the ladder stand, we had to do an extremely painful contortion with the tripod and lens set far off to the right to avoid a big oak leaf that would have otherwise covered the nest hole. Now, from the treestand, I had a clear view.
Sounds pretty straightforward, right? Well, here's what was involved in this shoot:
1 Warren and Sweat Ladder Stand
1 Cabela's Climbing Tree Stand.
1 24 foot extension ladder.
6 canvas tension straps.
2 rubber utility cables - to anchor the ladder stand.
2 Manfrotto variable friction Magic Arms.
3 Manfrotto Articulated Arms.
1 13 foot Manfrotto Light Pole.
1 Wimberley Gimbal head.
1 Gitzo Tripod.
4 sheets of Camouflage netting for the blind.
1 Hunting umbrella roof.
4 Sunpak flashes.
1 6 volt battery.
4 Stroboframe mini-hotshoe brackets.
1 custom built 2 flash bracket.
1 custom built flash console for power.
30 mini hand clamps.
4 large hand clamps.
10 plastic bags - for overnight weather-proofing.
1 10 foot flash cable.
1 Nikon AS15 hotshoe mount - for triggering the flash.
1 Canon 1D Mark IV camera.
1 500mm lens - used from the ladder stand.
1 400mm lens - used from the treestand.
A lot of gear and a lot of work, but the results were worth it for me, to photograph a nesting pileated woodpecker in my own woods, just yards from my studio. And, this also illustrates the wonderful shooting opportunities all of us often have at home, and how any opportunity should be exploited, even though I thought the birds might fledge even as I was setting up! They didn't, and I got three extra days of shooting after the first baby fledged!
As I write this our Crested Flycatcher is so tame that one of the pair sits on the photo perch I erected before the nesting season started completely at ease as I walk by, within 15 feet of the nest and perch. Although I've photographed this pair every summer, I'm sure I'll be tempted to do so again -- the babies have hatched and the adults are beginning to feed!